 Book A Tee Time
Find Your Fire On The Fairway
An unforgettable public golf experience in Komoka, just west of London, Ontario, shaped by bold design, natural beauty, and the thrill of the game.
From the first drive to the final putt, FireRock delivers a memorable golf experience for every pace and playing style.
A Round Worth Making
2027 Rates
Daily rates include a shared golf cart, driving-range access, and GPS-enabled cart technology.
Book A Tee TimeSee The Round Ahead.
Explore FireRock hole by hole from elevated tees and natural valleys to the risk-reward shots that define the course.
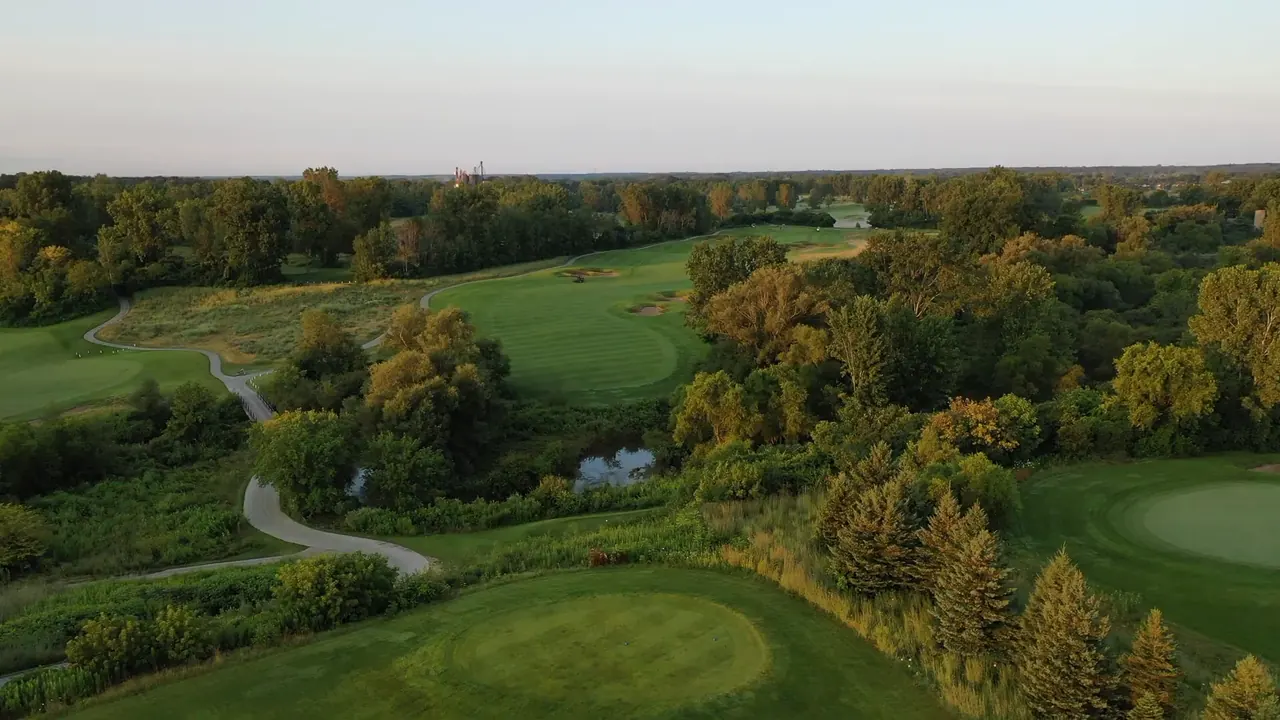
Golfers should be warmed up and ready to play as they arrive at the elevated first tee. What you see before you is a medium to long carry down across the Oxbow River Valley, which will come into play several more times throughout the round.
The first drive of the day is a little intimidating, however, the landing area on this 457 to 545-yard, par-5 is generously wide and forgiving. Watch out for the bunkers on the right. The hole sets up as a double dogleg and it will take two perfect shots early in the match to hit the green in two. There are bunkers on the left, leading to the raised green and a roll-off collar to the right.
Hole 1
Read the full hole-by-hole guide
Hole 1 Par 5 · Handicap 4
Golfers should be warmed up and ready to play as they arrive at the elevated first tee. What you see before you is a medium to long carry down across the Oxbow River Valley, which will come into play several more times throughout the round.
The first drive of the day is a little intimidating, however, the landing area on this 457 to 545-yard, par-5 is generously wide and forgiving. Watch out for the bunkers on the right. The hole sets up as a double dogleg and it will take two perfect shots early in the match to hit the green in two. There are bunkers on the left, leading to the raised green and a roll-off collar to the right.
Hole 2 Par 4 · Handicap 10
While it’s only the second hole of the day, the golfer is given a huge opportunity to bite off as much of the only man-made lake on the course as you think you can handle off the tee.
It’s a very inviting tee shot. From another elevated tee, the risk is that you’ll need to drive the ball over the water and sand bunkers that sit to the left, but the reward is a short iron onto the green on this 304 to 388-yard, par-4. If you’re lacking confidence after the first tee shot – the large bale out area is to the right! But why not have some fun – it’s just a game. This nasty green sits on a plateau that can be difficult to hold, but the greensite has no sand bunkers!
Hole 3 Par 3 · Handicap 12
The first par-3 threads through a corridor of old gravel spoils, with fescue-covered hills and thick rough waiting for a shot that misses the green. It plays 120 to 230 yards from the tees.
The tee shot travels slightly downhill into the prevailing wind to a raised green without bunkers. Because the green slopes from back to front, taking an extra club can help carry the trouble and hold the putting surface.
Hole 4 Par 4 · Handicap 14
This 295 to 399-yard par-4 gives you a choice from the tee. A fescue-covered sand and gravel mound divides the fairway, creating distinct routes to the green.
The right side offers a shorter approach but brings thick rough into play if the drive leaks too far. The left route leaves a longer second shot with a clearer angle away from the pot bunker near the right-center of the green.
Hole 5 Par 4 · Handicap 6
With the wind at your back, this 348 to 430-yard par-4 bends gently left and invites a driver. The best angle comes from the right side of the fairway, close to three bunkers in the landing area.
A safer drive to the left leaves a more demanding approach. Bunkers guard the front-left and back-left of the green, while a miss short and right can leave a manageable recovery.
Hole 6 Par 4 · Handicap 16
This sharp dogleg-right measures 294 to 382 yards on the card, but a bold tee shot can shorten the route considerably. Carrying the large bunker complex takes a powerful, accurate drive.
A more measured 3-wood or long iron through the middle opens the green for a short approach. The raised, sloping green has deep bunkers on both sides of its front edge.
Hole 7 Par 5 · Handicap 2
The prevailing wind helps on this 448 to 538-yard par-5, and the generous landing area makes the tee shot inviting. The pond shared with the second hole becomes the main decision on the next shot.
From about 200 yards out, water runs along the left toward FireRock’s largest green. Going for it in two means carrying water, while a controlled layup leaves a narrower but more reliable approach and a good birdie chance.
Hole 8 Par 3 · Handicap 18
An elevated tee looks across the Oxbow River valley to the green below on this 148 to 219-yard par-3. The river adds to the setting, while the bunkers around the green pose the more immediate challenge.
A bunker guards the front-left, and several more climb along the right side of the two-tiered green. A pin on the right asks for a precise tee shot, and par is a strong result.
Hole 9 Par 4 · Handicap 8
The front nine finishes along the Oxbow River Valley wall on a 327 to 404-yard par-4. The ground falls sharply away to the right, making the tee shot feel more demanding than its yardage suggests.
Five bunkers line the right side to catch shots headed toward the valley. Keeping the drive left sets up a clearer approach to a green guarded by a single bunker at the front.
Hole 10 Par 4 · Handicap 9
After a welcome breather at the clubhouse it’s time for an adventurous descent into the striking Oxbow River Valley. The challenge on this 334 to 416-yard, par-4 is to take the drive 250-yards over the left fairway bunkers and then let the ball roll down the moderate incline towards the green. There’s lots of room if you miss to the right, but three front right bunkers strategically protect this smallish green.
It will be a daring second shot off a downhill lie. Visiting any of those three-foot bunkers will make it extremely difficult, if not impossible, to get up and down for par. From the landing area it’s a 40-foot drop to the green surrounded by a majestic forested area.
Hole 11 Par 3 · Handicap 17
Sited in a densely wooded area that’s home to several 200-year-old black maples, No. 11 is the shortest hole on the course measuring just 109 to 175-yards off the back tees. Architect Thomas McBroom says it’s one of the sweetest par-3s he has ever crafted.
If you’re going to have one dead-solid straight tee shot, this should be the one. A delicate mid-iron must cross the banks of the Oxbow River not once, but twice to a tight green featuring a large run-off area at the front. The only safe alternative to the direct route over the Oxbow River is short and right, where a scrambling par remains a possibility.
Hole 12 Par 5 · Handicap 13
It’s time to have some fun with this exciting 410 to 487-yard, par-5, that could easily be a par-4 except that you’re hitting directly into the prevailing wind and it’s slightly uphill.
As the shortest par-5 on the course, it’s definitely an opportunity to get a shot or two back from par, but be careful of the bunkering in the first landing area. If you’re tempted to go for it in two and McBroom is counting on ‘golfers’ greed, you’ll have to deal with a series of six severe bunkers that guard the left and back portions of this sloping green defined by a stunning hedge row.
Hole 13 Par 4 · Handicap 7
This is the start to a brilliant collection of three consecutive par-4s that are key to scoring well on the back nine. An accurate tee shot that cuts over a large swath of environmentally protected Savannah grasses is required on this 328 to 410-yard dogleg right.
While there isn’t a bunker to be found anywhere in this natural setting, the fairway rolls naturally over a series of mounds left behind from the former sand pit into the landing area. The approach shot to the raised green requires precision to avoid runaway slopes and the railway line, which demarcates out-of-bounds along the left side of the hole.
Hole 14 Par 4 · Handicap 11
A brief interlude is provided by this short, two-shotter playing 264 to 361-yards. The smart player will leave the driver in the bag and opt to hit a 3-wood down the right side of the fairway and then an eight or nine-iron into a green that’s well protected by four bunkers on the left side.
That being said, there’s also the temptation to drive the ball over an enormous fescue-covered gravel spoil pile, a shot of about 270-yards from the back tees, on this dogleg left. For those who like to live dangerously it’s a gutsy shot that certainly isn’t for everyone, but it could leave you with a wedge in. The green is artistically melded into an elevated hedge row that frames the 12th and 17th greens and only adds to the natural setting.
Hole 15 Par 4 · Handicap 3
Although wide open in appearance this is one of the toughest holes on the course. When you stand on the tee deck, the wind usually blows right in your face as you bear down for the longest carry of the day over a seemingly endless field of Savannah grass. The correct line to the hole favours the left side, skirting several bunkers punctuated by abrupt towering relict forms decorated in fescue grasses.
The hole sets up much easier from the left. Those erring on the right side must deal with another nasty patch of tall grasses on the second shot and pretty much fly the ball directly to another raised green that’s protected by a single bunker out front.
Hole 16 Par 5 · Handicap 5
There’s no chance of getting home in two on the longest par-5 on the course; so don’t even think about it. The best strategy is to hit two well-positioned shots, not necessarily a driver, leaving a short iron or wedge into the green for a shot at birdie.
That said, the wind is at your back for the last time and you’ll need to avoid a huge sand trap to the right of a slender fairway landing area on this 481 to 569-yard, par-5. Stay left, because further down the fairway there’s another large and cruel bunker to the right of the second shot landing area that should be avoided at all costs. This raised green is bunkered both front left and right.
Hole 17 Par 3 · Handicap 15
The final par-3 plays 120 to 197 yards to a green set on a natural rise among old spoil piles. Its open view can make the tee shot look simpler than it is.
Bunkers climb the right side but stop short of the green, creating a deceptive sense of distance. On the left, a steep hollow catches shots that roll off the putting surface.
Hole 18 Par 4 · Handicap 1
FireRock closes with a dramatic view from the valley wall toward the clubhouse. From the forward tees the hole plays as a par-5; from the other tees it is a demanding 402 to 454-yard par-4.
The drive must find a narrow landing area below while avoiding a large bunker to the right. Enough distance off the tee is important to keep the Oxbow River from complicating the approach.
2027 Men’s League
Join us each week for friendly competition, great company, and a men’s league that makes every round even better.
Register
2027 Men’s League
A weekly men’s league for golfers who enjoy friendly competition, good company, and a reason to stay for another round.
Frequently Asked Questions
A few useful details before you arrive. If you need anything else, our team is happy to help.
We’re located at 10345 Oxbow Drive in Komoka, Ontario, just five minutes west of London.